
How I make my dress-up games (using html and css)
[This is an explanation that I wrote up on tumblr, that a friend asked me to put on my website for easy access. Here it is, my friend!]
I wouldn't say this is precisely a "tutorial", more of an explanation of how I made my batman dress-up game since I've had a few people ask me how I did it, and I'd like to try my hand at explaining it to the best of my ability. Hopefully my explanations will be good enough that even a beginner at html and css will be able to understand what is going on, but if you do end up feeling lost during my explanations, I suggest learning some html and css first and then coming back to this explanation.
Also please keep in mind I'm not an "expert" at html and css, I've just been doing an okay job with it on my website. So if you're better at it than me and see this explanation and think it's cringe and/or absolute shit, I'm sorry LMAO.
Also also, I did not come up with the original code myself, it was made by sillybeanies on neocities, who said it was okay to use the code they had made to make your own dress-up game. And as I messed with the code to understand how it worked, I eventually got to the point where I was able to make my batman dress-up game.
The explanation, finally.
This explanation goes into both the code aspect of making the game as well as the art aspect. I suggest reading both sections as the art and the code does intertwine and you'll need to coordinate them both so that your dress-up game doesn't encounter any issues. The game uses only html and css (using draggable divs), as well as specifically placed images. You will need to know at least some html and css, and if you want your dress-up game to be played by others it will need to be hosted on a website of some kind (neocities is free!)
The code
There are two parts to this code, the css part which tells us what something is meant to look like (height, width, alignment etc), and then the html part which tells us what is actually on the page (the doll and the clothes, for example, which are all png images) and how it all acts. I'll start with the css first since it will give us context to what is happening in the html code.
.dragme {
display: inline-block;
}
#field {
height: 1000px;
max-width: 800px;
text-align: right;
align-content: right;
}
This simple code is doing two things:
- We are giving a name to what will soon be the draggable div/the items of clothing (we've called it "dragme"), and we are ensuring that the clothing will appear next to each other (horizontally) when each line of clothing-code is added, rather than underneath (vertically).
- We are specifying how big the "play area" of the dress up game is (called #field) and where all the clothes will default to being placed when their position isn't specified (they will be placed on the right side of the play area).
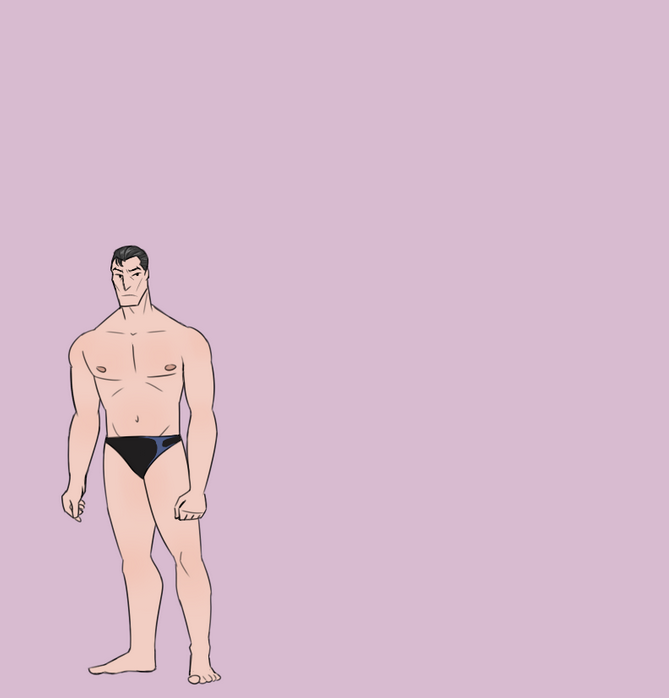
You'll notice that I made the height 1000 pixels high and 800 pixels wide. This is the exact size of the "doll" I have made, which is basically just a .png of bruce in his underwear in front of a lavender background. So, the #field and the actual image used for the doll have to be the exact same size.
Now that we've gone over what the css code is doing, we can look at what the html code is doing. Here is a very basic example of two lines of html code in my batman dress-up game. We're starting with the play-area code first.
<div id="field" style="background:url('/graphics/dressup/batman/doll.png');>
This is rather simple to explain. We have a div which we've given the ID as being the play area (#field) and styled it to have an image as the background, which is our almost-naked bruce in front of a light purple colour. We do not close the div until we've put all of the clothing code into the page, which we're going to look at now.
<div class="dragme ui-draggable" style="position: relative; bottom: 180px; left: 64px;">
<img src="/graphics/dressup/batman/SHIRT-beyond.png" style="margin-left: -100px;">
</div>
<div class="dragme ui-draggable" style="position: relative; bottom: 230px; right: 8px;">
<img src="/graphics/dressup/batman/SHIRT-grey.png" style="margin-left: -100px;">
</div>
As you can see, I have two lines of code that look very similar to each other. Each corresponds to an item of clothing. The first one is the batman beyond shirt and the second one is the basic batman shirt. They look like this.
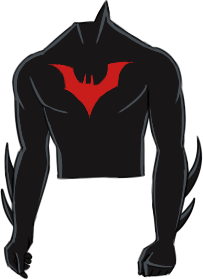
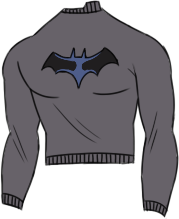
The first line of code will show up as the black shirt, and it will be on the bottom-most layer, when you start moving clothes around on the play area. The grey shirt (the second line of code) will show up on top of it. So, you have to essentially make a list of clothing types, which layers you want them to be on, from bottom to top, and then place the code in that exact order to ensure that you don't get any weird clothing clipping going on (such as skinny pants ending up on top of big chunky combat boots, which isn't how clothing usually works lol).
But what is the code actually doing? Let's examine.
First, we've classified the clothing as a div that is draggable, by using div class="dragme ui-draggable" at the start. Then, we have the style, which dictates the exact position that each clothing will have on the page. Two things to note here:
- Each clothing will have different positions. When you put in the clothing code without specifying where all of the individual clothes are meant to go, it looks like this.
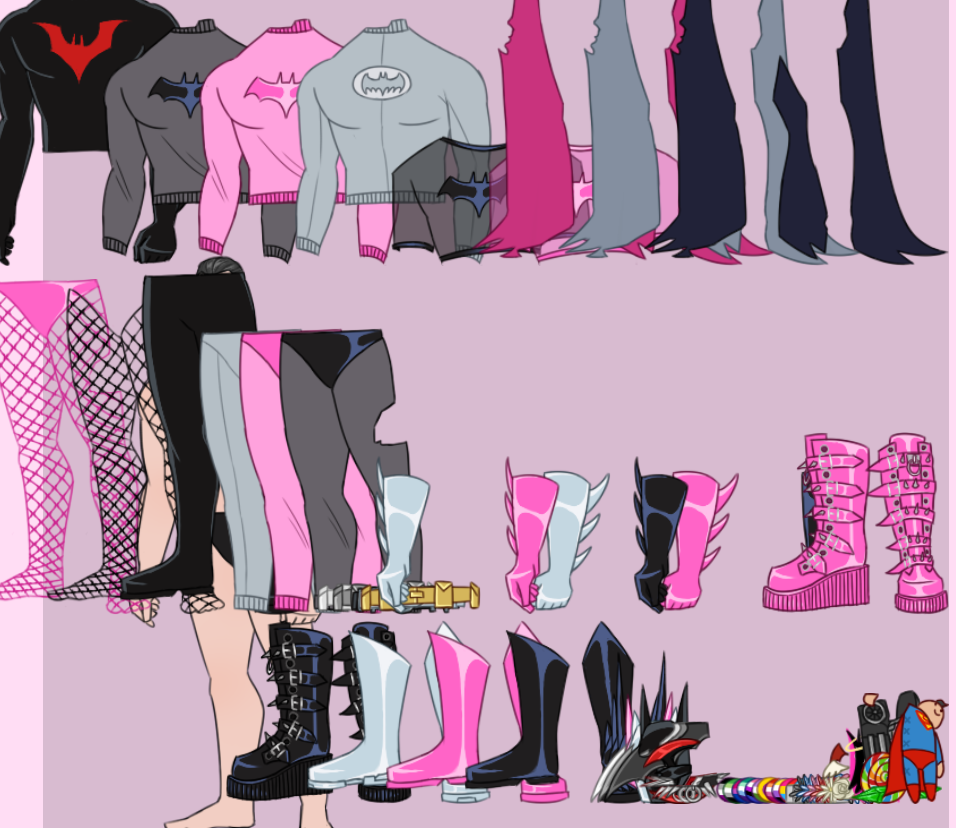
You can see that all of the clothing to the top left is the code that came first, and the clothing to the bottom right are the last lines of clothing code. Which is why you need to specify for each individual bit of clothing where it's going to go- the amount of pixels that it has to move is being based on its “original position” as seen in the above image. - With the "bottom: —px;" and "right: —px;" code, you need to understand that despite the name “bottom” and “right”, we are not actually pushing the image down or to the right. It's about how many pixels we have placed on the “bottom” and “right” of the image. Meaning, we're actually pushing the image UPWARDS and to the LEFT. It's like we put an invisible box that was a certain height of pixels, and placed the image above it, and then we placed an invisible box to the right of the image, which made the image get pushed to the left. That's kind of what we're doing. You'll also notice that I pushed one of the images right instead of the left, and that is due to the fact that the piece of clothing was actually too close to the other shirt, so I wanted it to have some space.
Then, of course, we have the image code itself which is pretty self-explanatory:
<img src="/graphics/dressup/batman/SHIRT-grey.png" —
...but we’ve added some more styling to it.
— style="margin-left: -100px;">
You’ll notice that unlike with the styling of the div, the styling of the image is the SAME for both of the clothing items. This is to ensure the clothing can overlap each other at an even rate when I’m putting the initial clothing code into the dress-up webpage. It pushes the images closer to each other and overlaps them before I add any additional positioning with the code we looked at earlier. Because otherwise it looks even worse and more chaotic than the image I showed before. The clothing goes off the entire page, basically. Almost all the clothes have the margin go left and be -100px except for the three capes which ended up being -200px because they are the largest clothing items in my dress-up game and needed more overlapping to occur so they would fit on the same page, lmao.
That’s the gist of the code and how it works. The two lines of code essentially get repeated, with the url’s for the code being different for each clothing article, and the positioning of each clothing being different. Below is a blank example of all of these bits of code put together. If you chose to use this as a template, just keep in mind you will probably need to edit it significantly to get all the clothes positioned correctly.
CSS - this can go in the css file, or in the html file with the <style> tag. If it’s going in the html file, have it be placed before the <body> tag.
.dragme {
display: inline-block;
}
#field {
height: 1000px;
max-width: 800px;
text-align: right;
align-content: right;
}
HTML - put this in the main area where you usually put your content (pictures, text, etc.)
<div id=“field” style=“background:url(‘URL FOR YOUR DOLL GOES HERE’);”>
<!– clothes go below this. the code below can be copied as many times as needed. –>
<div class=“dragme ui-draggable” style=“position: relative; bottom: —px; left: —px;”>
<img src=“URL FOR THE CLOTHING GOES HERE” style=“margin-left: -100px;”>
</div>
<!– end of clothing. –>
</div>
All of the "—px" is where you will have to figure out how big you want the field to be, or how you want the clothes to be positioned. Also, you may find that instead of using "left" you may need to use "right"instead, based on where you want the clothing to go. Just experiment and see what happens! This is where a coding program like phoenix code or something else can come in handy, since you can see all the changes that happen to your dress-up game in real-time (something I absolutely required for this project).
Okay so that’s the code explained to the best of my ability. Now onto the art.
The art
As was mentioned before, the code for the play area (#field) was the same height and width as the “doll” that we’re dressing up. The best way to go about making a dress-up game using the code above is to first plan out the basic sketch of the doll and the clothes, and where you want them all to go and how many you’re going to have. Kinda like this picture here.

Once you’re certain of the canvas size for your dress-up game, keep a note of its height and width (in pixels). Those will be the numbers you put in the #field area of the css code.
The first thing you should draw is the doll itself. The character and the background should be one .png image, like this.
Then, it’s onto the clothes. I suggest drawing the clothes over the top of the doll, so you know that the clothes will fit the doll. I also suggest making the clothing somewhat larger than the doll itself, so you do not have to be ultra precise when you’re dressing up the doll. This is a mistake that I made with the Batman dress-up, which annoyed me greatly and made it harder for players to place clothes as they had to be very accurate for it to look nice and not weird.
Each clothing article will need to be its own .png image, with a transparent background. I suggest ensuring that you’ve cropped it so that there is no extra canvas beyond the lines of the clothing. If you’re a crazy person like me and want to add shading and lighting to the clothes…just remember that you will be combining the layers at the end to create the png, so be prepared for a lot of work.
You also don’t really "need" to draw the art if you don’t want to. The person who created the original code, sillybeanies, did so using pictures of their beanie babies and finding images of clothes online which they then photoshopped in order to fit the beanie baby dress-up doll. You can kinda just do whatever you want. But I’m an artist so I chose to draw my game instead.
After you’ve drawn all of the art, you need to save them all as .png images and then host them somewhere. Either the website itself or on a place like file.garden. Do not host your stuff on Discord, people! Those image urls are temporary and you will quickly end up with an empty webpage. Then, it’s as simple as putting the image urls into the code that I showed above into your dress-up webpage. But uhhh I’m not gonna get into the details of how you run/code a website, I just figured if you’re reading this you probably already have one or are going to make one at some point.
This is the basic gist of how I made my dress-up game. It’s not as crazy as it seems once you figure out the code, it’s just a lot of tedious work. It took a week for me to make the game, and that was mostly drawing. It took a day or two to code. I hope this explanation was helpful. If not feel free to burn me at the stake or whatever (or just ask me questions over at my guestbook! I’m happy to answer).