
How To Make Cursors
(and other practical information about cursors which you should probably know)
Hello! This is my tutorial on how to make custom cursors, but it's also a bunch of information on cursors themselves. I am specifically only talking about Windows cursors, as that is the current OS that I use, and Windows cursors are insanely easy to make yourself (you do not need any special software unless you're trying to make animated cursors), so please keep that in mind!
Also I don't have like, a PHD in cursors or anything like that (LMAO), I just use and create custom cursors for fun, and this is just all the stuff I've learned in the few years that I've been doing this. If you have any suggestions on how to make this tutorial better or just need a bit of help, you can send a message over on my guestbook and I'll do my best to answer!
Before I start on explaining how to make cursors, I first want to talk about how cursors actually work and function, and what the different file types actually mean, and when you should be using which file type, and just a bunch of other questions that people may have that I already have the answer to. I think it's really important to actually understand how cursors function so that when you start making and using them, you actually know what the hell is going on.
Cursors on your local computer
If you're using a cursor on your computer (by changing the mouse settings and picking a different cursor), there are two main file types that you can use- .cur and .ani. These two file types function almost the exact same way, but .cur is for static image cursors, and .ani is for animated cursors. Both the .cur and .ani. files have a piece of information within them called the "hotspot" which is the exact point where the "click" function occurs. Depending on the cursor's design, the hotspot may not always be at the top left of the cursor, such as for cursors with unique designs, or cursors that are designed for left-handed users.
Cursors on your website
The great thing about using cursors on your website is that you do not always have to use a .cur file as your cursor. If you're using the correct CSS code, you can use a simple .png or .gif file as your website's cursor, and the CSS takes care of the hotspot for you, by automatically putting it at the top left corner of the .png or .gif. This works fine for cursors which are designed to have the hotspot at the top left of the cursor, but it will not work for more unique cursor designs.
The difference between the two sets of files, and the limitations.
There is always a bit of a limit on what you can or can't do with .cur & .ani cursors versus .png and .gif cursors. For example, if you want to use a custom cursor on your computer, the MAX size that a .cur or .ani cursor can be is 32x32 pixels. That is the size of the canvas that you have to work with, so you WILL have to fit whatever design you want to create within that space. However, if you're using a .png or .gif file as a cursor on your website, the size of the .png or .gif isn't an issue at all. You can have the cursor big as big as you want! The downside is, if you're designing a larger, unique cursor that would likely not have the hotspot be at the top left of the image, you're out of luck. You either have to have the cursor be smaller to fit the .cur size, or you have to redesign the large cursor to have the hotspot at the top left of the image.
Could I use a .cur or .ani file on my website?
For a .cur file, absolutely! But not with .ani files.
While the main "pink batman symbol" cursor that I use on the website is a .png file, the other cursor (the "pink batman gauntlet cursor") which you see when you hover over a link is actually a .cur file due to the fact that the hotspot had to be placed in a very specific spot. Unfortunately, you cannot host .cur files on neocities without being a supporter, however you can host them on filegarden, which is what I did! (Filegarden being a completely free website to host images and other files, which you can then hotlink to places like neocities or other websites. All you need is an account).
What about using a .png or .gif file for my computer's local cursor?
Well...technically you can but the result is...well...not great. The hotspot will automatically be put at the top left corner of the image, and the image, even if it is the correct size (32x32), will get warped and resized and will look very strange. Trust me, I've tried. So, unfortunately you can only stick to .cur and .ani files for your computer's cursor.
The conclusion to all this information is...?
That you can use at least 3 different file types for your cursors on your website, but only two for your computer, and the different sets of file types have different properties and limitations, and you will have to create a cursor design that fits within these limitations!
OKAY how do you actually make a cursor? Please tell me?
By having fun and being yourself :) haha just kidding. You need an art program of some kind. It can be any free or paid or pirated art program that you like! What is most important is that this art program of yours understands and keeps transparency information. So, no using MS paint unless you want to have a white square as your cursor (you do you though, if that's what you're actually going for lmao).
The first step is to open up a canvas that is 32x32 pixels. You technically could go bigger if you're only looking to use a cursor on a website, but for now we'll stick with the .cur canvas size limitations.
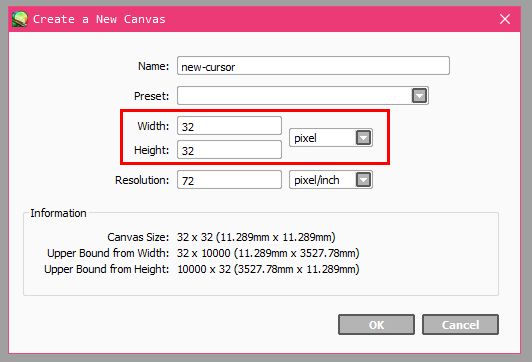
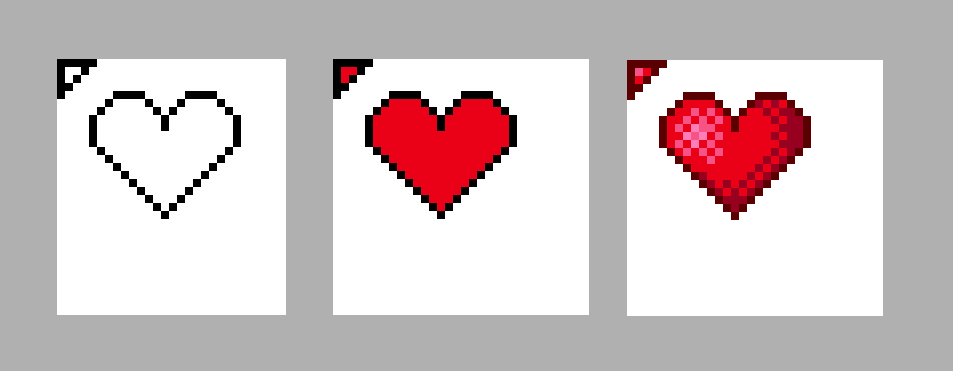
The next step is to draw! I personally like to start with the tiny little cursor triangle first, so I know where the hotspot is meant to go. But you can do whatever you want :3
Then, I draw whatever it is I feel like drawing. I'm using a pixel brush that comes with my program (which is Paint Tool Sai), as cursors tend to do really well in a pixel-art style, but do whatever you like!
Important tips on creating a cursor that is easily visible on any background
The biggest tip I have when creating a cursor is to ensure you have some sort of "outline" around the cursor which allows it to stand out on multiple different coloured backgrounds. I usually go for white, but honestly any really light colour works well. I will show pictures below of cursors with and without an outline in front of a bunch of backgrounds to show exactly why this is important.


As you can see, the cursor with the outline does a lot better than the cursor without the outline, which can be problematic if you're like me and like using dark-mode on a variety of different websites. It's just more visible and thus more accessible :)
Alrighty then, so your drawing is done. Now we save the file as a .png! If you're just using the cursor for a website, then you're completely done, and all you have to do is upload it to your website (or another file-hosting website) and then put the cursor into your CSS code (which we'll get into in a bit). But, since we went with the max size for a .cur cursor, let's get into how you actually create a .cur file!
Turning a .png file into a .cur file
The way that I personally turn an image file into a cursor file is by going onto the website cursor.cc and importing my already created imaged! Of course, you can also use the website's own built in cursor creator/editor, but I personally find the individual white lines in-between each pixel to be rather annoying, and it makes it hard to see what I'm actually drawing, so I prefer using my own program. But you should use whatever feels right for you!
The next step is to click on the hotspot option on the right, and the put the hotspot where you think is the most appropriate for your cursor! Then, click download cursor, and you will get the .cur file.
Now that you have a cursor, next step is to figure out where it should go!
Using your custom cursor on your computer
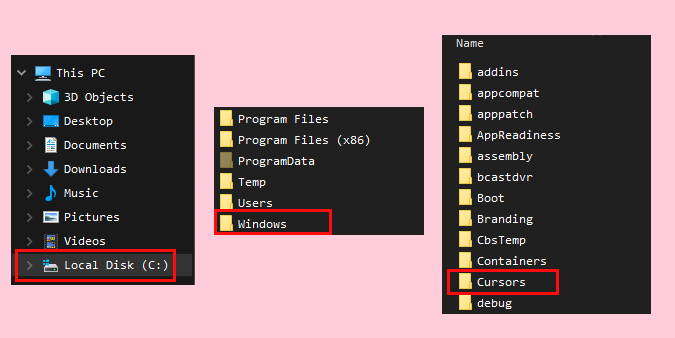
In order to ensure that your cursor will not revert back to the standard Windows cursors when you restart you computer, you have to place your new cursor in the same place that all the other Windows cursors are located. So, that means you have to go to Local Disk -> Windows -> Cursors and then place your new .cur file in the Cursors folder.
After that's done, you're free to go to your mouse settings and set your new cursor as the pointer! (And make sure to save it as a new theme/scheme so you don't lose it either).
Using your custom cursor on your website
Whether you're just using a simple .png file for your website's cursor, or even a .cur file, I'll show you how and where to put the file in your code! Go ahead and upload your cursor to your neocities dashboard (or your filegarden if you're using a .cur file) so you have a URL of the cursor.
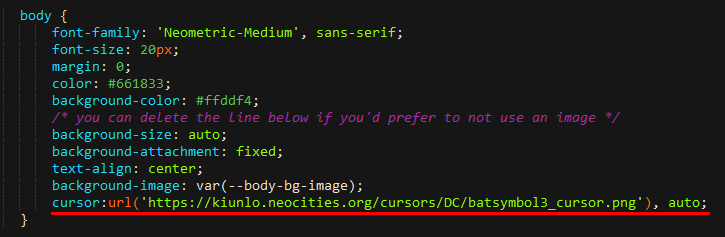
Now, we can start coding! In your CSS file in the body section, you will want to have this code down the bottom:
cursor:url('INSERT URL HERE'), auto;
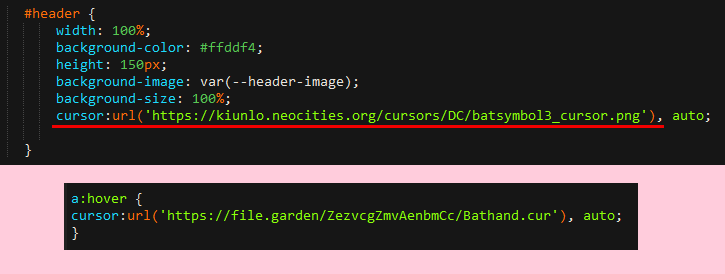
Yay! You did it! But..oh no, it's only showing up on certain places of the page! If for example you have a header, or a lot of links, and you want the same cursor (or even a different cursor) to show up when in the header area, or when hovering over links, you'll have to put the same code in those areas of your CSS.
Okay yay!!! We did it!
That's it for this tutorial! I didn't go over animated cursors in this particular tutorial since that's a bit more complicated, but if I have the time in the future, I can make one. Happy cursor making!