
How To Make Animated Cursors
Hello there, this is my tutorial on how to make animated cursors! If you've never made cursors before...you should probably go back and read my tutorial on making static-image cursors first, because you'll need all the knowledge in that tutorial to be able to follow along to this one!
The program we'll be using
First of all, making animated cursors requires a designated program to be able to do it, since we're dealing with both animation frames as well as cursor hotspots. I usually use RealWorld Cursor Editor (RWCE) for this, since the program is simple and easy to use, even for a noob. But I will still be explaining the basic layout of the program regardless, and the tools we'll mostly be using and what they all do.
IMPORTANT NOTE: I have in the past had issues with RWCE, especially with some cursors' frames becoming corrupted when I was editing/saving/making the cursors, meaning I had to make those frames again from scratch. I personally recommend making the actual frames in a different program that has layers (photoshop, paint tool sai, gimp etc.) and just having the different animation frames be on different layers. I will show you later how we deal with getting those frames into RWCE.
Of course, you can just make the cursors entirely in RWCE, I'd just recommend making backups in case one of them becomes corrupted as you're making them.
How to navigate the program
When you open the program, you'll probably be on the "Online" tab. We can ignore this tab entirely and go to the "Create" tab.
At this point, regardless of whether we're making out cursor in this program or intend on importing our already-created images into RWCE, we'll need to click on "New mouse cursor" and then click on "Create" on the buttom right. You do not need to change any of the settings, as they are already on the best settings for creating a cursor.
Now we can see the layout of the program. I will highlight the most important parts of the layout and tools, and tell you what they all are.
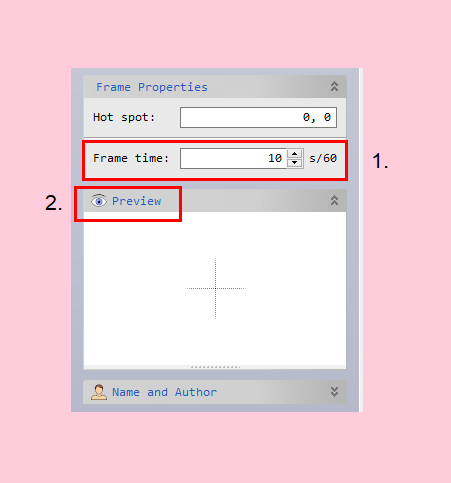
On the left side of the program, we have the frame properties.
#1 is the amount of seconds that go by between each frame. The smaller the number, the faster/smoother the frames are, and the bigger the number, the longer it takes for each frame to go by.
#2 is the preview box, which shows you the animation of your cursor in full. The cross in the middle is where the hotspot is, and you can actually move the cursor around in the preview box, which changes where the hotspot is. I don't suggest doing that, as there is a dedicated tool for placing the hotspot.
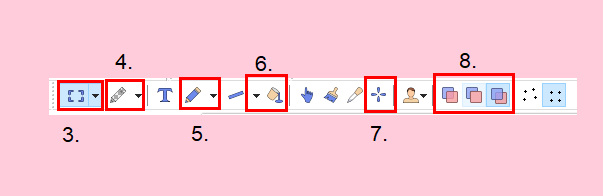
Right above the drawing area are the tools.
#3 is the select/move tool. Suggestion: if you're going to be moving your drawing around using this tool, make sure you tick the "preserve aspect ratio" box the shows up on the tool properties on the top right of the program. That way your image won't suddenly become weird and pixelated when moving it around.
#4 is the eraser tool.
#5 is the pencil tool. Great for pixel art, as long as you choose the single pixel option.
#6 is the fill tool.
#7 is the hotspot tool, which allows you to place the exact place the "click" function occurs (left click, right click, middle click etc.)
#8 is a very interesting tool, that I find to be useful when doing the white outlines I usually do for my cursors. The first two boxes are labelled as "paint over" and "replace" which basically act the same, where you're painting over what you've already drawn. But the third box on the right is labelled "paint under" which allows you to draw underneath what you've already drawn, without actually having a layer underneath your current one. Comes in handy for those white outlines!
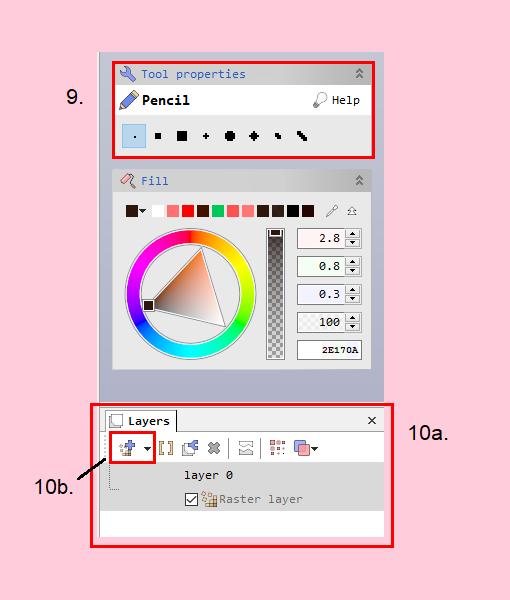
On the right side of the program are some more helpful properties.
#9 is the tool properties that I was talking about. Changes depending on what tool you've got selected.
#10a is where the layers are, like what you'd see on any drawing program that has layers.
#10b is where you create a new layer. I'm pointing this out specifically because if you try to create a new layer right out the gate, you might encounter an error. Just click on the downward pointing arrow and select "Raster layer" and then you should be able to create new layers after that.
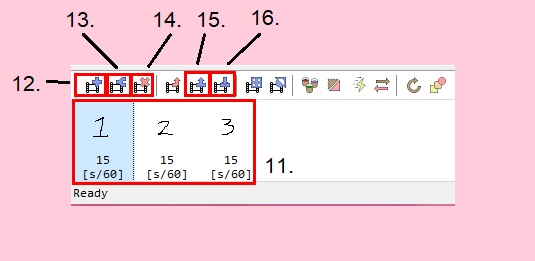
On the bottom of the program are the actual animation frames themselves.
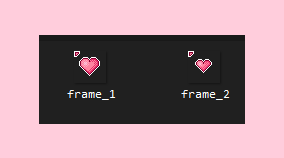
#11 are the frames of your animated cursor. I've drawn numbers on each different frame as reference. The highlighted one is the selected frame, and that will be the frame you're editing in the drawing area.
#12 is the button to add a new animation frame.
#13 is the button to duplicate the selected frame.
#14 is the button to deleted a selected frame.
#15 is the button to copy a selected frame.
#16 is the button for pasting the already copied frame.
So, that was the basic gist of the layout! Now you should be able to understand where the most important stuff is and what it does.
Actually making an animated cursor (within RWCE)
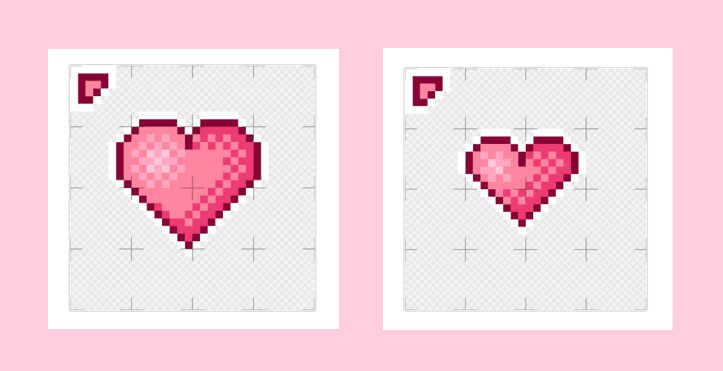
The first place to start is to figure out WHAT it is you want to create. I suggest starting out simple at first, so that you can get acquainted with the program before you start doing anything more complex or difficult. I'm gonna make a simple 2-frame animated cursor of a heart getting bigger and smaller, to make things really simple for this tutorial.
First, I'm going to start out doing what I always do, and just draw some basic outlines of the shape/cursor. I'll then place the hotspot in the place I thinks is most important. Then, I'm going to duplicate the frame, and draw a smaller heart inside of the original heart. Then, I'll erase the bigger heart!

Now, I'll add some basic colouring and shading to both of the hearts!
Okay, now that I've got both of the frames finished, now it's time for me to figure out the timing of this animated cursor. I decided to go for 23, since I liked the speed between the "pulses" of the heart the best at 23. I had to select both the frames (by clicking on one of the frames and then pressing "ctrl + a") and then edit the frame time, since you can edit the timing on the frame to be different for each frame, and we want the speed to be the same for both frames.
Now I'm going to save this as a .rcu, which is a layered cursor file. It's basically like saving a drawing as a .psd to keep all the layer information before you export it as a .png. This will be our backup in case things go wrong.
Now that we've got our backup file, we can now save it as a .ani (which will show up in the file types as "Animated cursor files")
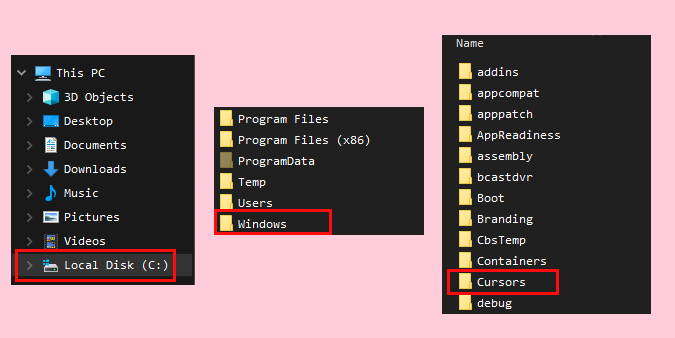
Yay, we did it! Now it's time to test this thing. Just like in the previous tutorial, we need to put this cursor where all the other default windows cursors are meant to go before we change our cursor in our mouse settings.
I've just tested my newly created animated cursor, and it seems to work perfectly fine! Yippeeee!!! Look at this cute little thing!!! 
How to import frames you already drew in another program
If you're going the route that I usually take, which is where I create all the frames in a different program, the first thing we need to do is export all of the frames as individual .png files and put them in an folder that will be easy to access.
What we want to do now is create a new cursor in RWCE, following the exact instructions at beginning of the tutorial.
Now, click on the "insert frame" button to add a new frame until we have the same amount of frames as images that we created. Then, select the first frame.
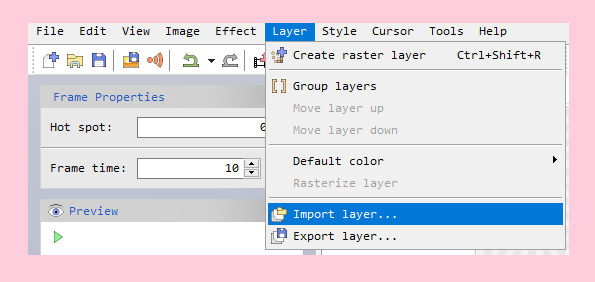
After that, we'll click on the "layer" tab at the top of the program, and click on "import layer" and find the first image that we made.
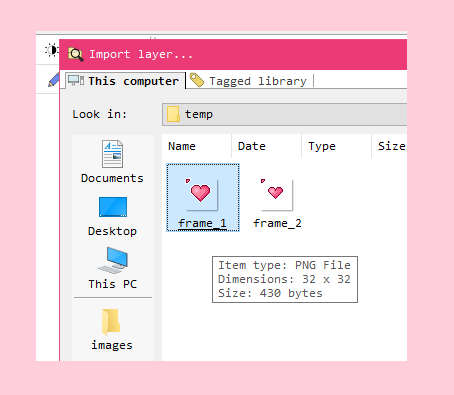
Now we'll select the next frame, and do the same again, until we've imported all the images into RWCE.
Then all we have to do is place the hotspot in each of the frames, and adjust the frame time to how we want it, and then save it as a .ani! Basically the same instructions as above.
Okay I think we did it!
Yay, you made your first animated cursor! You can also make .gif cursors using this program, which will only be able to used on websites and such using CSS.
Always keep in mind that the more frames you add, and the more complex your design, the harder and more time consuming making your animated cursor will be. But it'll be totally worth the effort in the end! Happy cursor making!